Showing posts with label side dishes. Show all posts

Mar 6, 2014

Fried Apples

My grandma used to cook simple meals.  Fried potatoes, hamburger patties, and fried apples were often seen at our dinner table. So was liver and onions with canned spinach. That was my least favorite meal.

Tonight while cooking dinner I was craving fried apples. I usually burn them when I try to cook them. Tonight I tried something different and was successful at cooking at them perfectly.

The Imaginative One refused to touch them but the Wee One loved them.
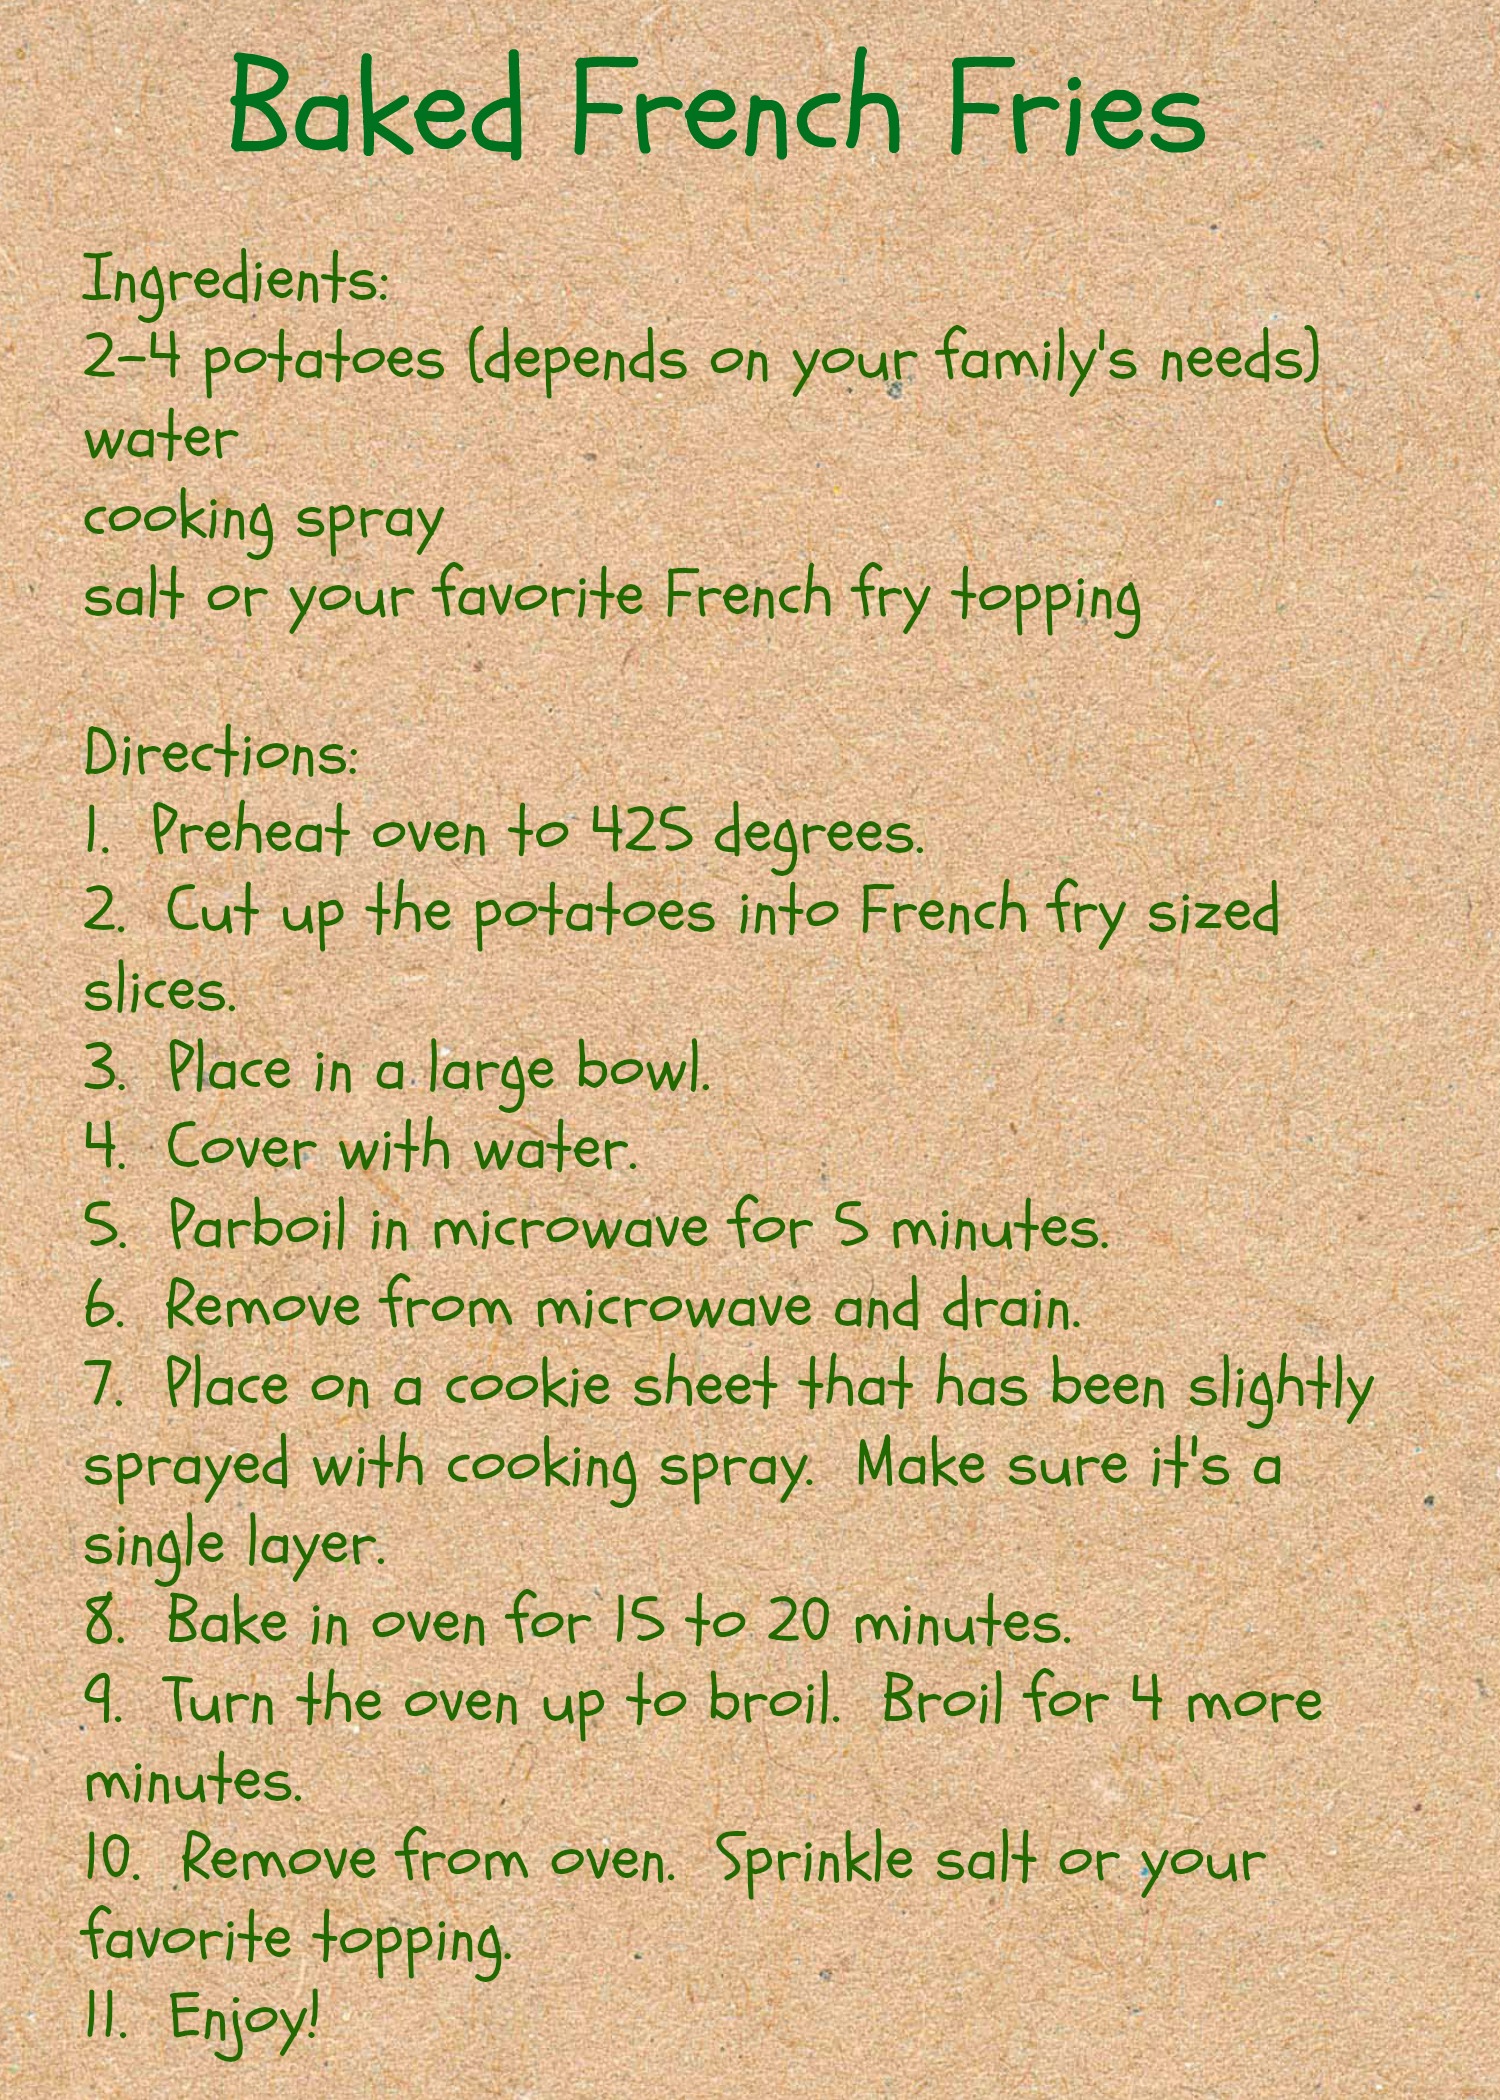

Fried Apples


Stars of the recipe:
  • 2 apples cored and sliced into 1/4 to 1/2 inch slices
  • 2 tablespoons of butter  
  • 2 tablespoons of Brown sugar 
  • 1 tablespoon of cinnamon

Steps:
  1. Heat skillet on medium heat. 
  2. Melt butter in skillet.
  3. Add remaining ingredients. 
  4. Stir until apples are coated with melted butter,  brown sugar, and cinnamon. 
  5. Cook for 3 minutes.
  6. Turn heat to low. Cover and cook for 5 minutes. 
  7. Take off of heat. 
  8. Enjoy by itself, with whipped cream, or over ice cream.

Feb 15, 2014

Baked French Fries

The Imaginative One could live on chocolate, popcorn, and French Fries.  I've started baking my French Fries.  He loves them and will eat any fries left on the tray.
The first hundred times (maybe not that much), it would take the fries a long time to bake which doesn't help when I have to get dinner on the table between 5 and 5:10 so hubby can eat and get to work.  So I decided to do something different.  I cut up the potatoes and then out them into a microwaveable bowl, cover the potatoes with water (about an inch above), and then parboil them in the microwave for 5 minutes.  Then I drain the potatoes, spread them on a greased cookie sheet, and then bake.  They turn out perfect.
To cut the potatoes into fries, I first cut the potatoes in half length wise.  I place one of the half flat size down and cut it half.  I then cut each half in half once again.  If the fries are still too big, I once again cut it in half.  If not, I place it in the pile of fries.  I repeat with the other halves.  Here's what the look like after I cut the potatoes:
1911543_10203413553722976_458301219_o
Here is the potatoes in the water:
1908944_10203413552202938_1784265323_o
I used my 8 cup measuring cup so the fries were able to stand up in the water.

Baked French Fries

1889429_10203413551602923_1404830807_o
Baked French Fries

Sep 15, 2013

Homemade Applesauce

I'm so proud of myself.  Today we were given a chance to go apple picking at one of our fellow church member's houses.  We could take as much as we wanted which is totally cool.  The Imaginative One is a fussy eater but loves his apples and applesauce.  So I jumped at the chance.  

We picked a lot of apples and made memories with the boys.  The Imaginative One ended up getting stung by a bee but was happy because the apples were absolutely delicious.  That made up for his finger being stung.  

Once we got home, I washed some of the less attractive ones.  Then I peeled and cut them into smaller pieces.  I placed into one of my bigger pots, covered the apples with water, and cooked them for half and hour.  The boys then helped me puree the apples in the blender for a smoother applesauce.  The end result was a delicious applesauce.

So why am I proud of myself.  I made homemade applesauce that I know the boys will eat.  I made memories with the boys.  We picked the apples and within 2.5 hours I had applesauce.  That is why I'm proud of myself.

Homemade Smooth Applesauce


IMG_0576[1]

Stars of the recipe:

  • 3 to 4 pounds of apples, peeled and quartered (or cut smaller)

  • cinnamon to taste or cinnamon sticks

  • water

  • sugar to taste (1/4 to 3/4 c.)


Steps:

  1. Wash, peel, and cut apples.

  2. Place in a big pot and then cover with water.  Sprinkle with cinnamon or put in the cinnamon sticks.

  3. Put the pot on the stove and turn the heat on to high.

  4. Allow the water to boil and then turn to medium low.

  5. Cook until apples are tender.

  6. Either use a food mill or a blender to puree the apples.  (We used the blender.  When we did, we used the apples and some of the cooking water.)

  7. Place in a bowl.  Sprinkle with more cinnamon and sugar to taste.

  8. Enjoy warm or cooled down.


[gallery ids="4316,4317,4318,4319,4320"]

Jun 2, 2013

Restaurant style salsa

The Wee One and I like to crack open a jar of salsa and then enjoy it with tortilla chips. This usually our evening snack. So when I saw this recipe the other day I decided to make it. After I made it, the Wee One and I snacked on it. Did it meet his deal of approval? You decide . . .

20130602-153731.jpg

That's the bowl after we were finished snacking on it. He and I both loved it.

Restaurant Style Salsa
Mommy Hates Cooking


20130602-154742.jpg


Stars of the recipe:

  • 1 28oz Can of Peeled Whole Tomatoes with Juice

  • 1 4oz Can of Green Chilies, Chopped

  • 1/4 Cup White Onion, Chopped

  • 1 Clove of Garlic, Crushed

  • 1/4 Tsp Sugar or substitute

  • 1/4 Tsp Salt

  • 1/4 Tsp Cumin

  • 1/2 Cup Cilantro, Chopped (I left this put and it was okay. )

  • 1 Lime

  • Red or Green Jalapeño Peppers (I left these out too. )


Steps:

  1. In a food processor or blender combine the tomatoes, chilies, onion, garlic, sugar, salt, cumin, and cilantro. (I used my blender on the purée setting. )

  2. Cut the lime in half and squeeze the juice out over the ingredients.

  3. Add the peppers if using them.

  4. Purée this in the blender or food processor until puréed.

  5. Enjoy with chips.


Freeze or can the leftovers.

Apr 14, 2013

Pesto Orzo Pasta Salad

20130412-221855.jpg

I tried to come up with a witty blog entry about this salad.  Even though I thought and thought, I couldn't come up with anything.  So I'll just be straightforward.  This recipe is delicious and easy to put together.  You can adapt it by changing up the veggies in the salad.  

Stars of the recipe:

  • 1/2 cup orzo pasta

  • 1/4 Tbsp. pesto

  • 1/4 c. broccoli florets

  • 1/4 c. grape tomatoes, cut in half or even fourths

  • 1/4 c. bell pepper, diced (I used yellow.)

  • 2 Tbsp. diced black olives

  • 2 Tbsp. Feta cheese


Steps:

  1. Cook orzo pasta according to package directions.  Put broccoli florets in the cooking water for the last 3 minutes of the pasta cooking time.

  2. Drain pasta and broccoli in a strainer.  Run cool water over the pasta and broccoli to stop the cooking process.

  3. Combine all the ingredients in a bowl.

  4. Enjoy!


This made 3 servings for me.

Mar 25, 2013

Potato Wedges

The Imaginative One loves French fries.  He is the biggest French fry stealer so when I made these and he kept trying to take wedges from various family members, I knew this was a hit!  They were so crispy which is the way I love them.  I ate them without any condiments because they were that good!

IMG_7190[1]


Potato Wedges


Stars of the recipe:

  • 2 russet potatoes, cut into wedges

  • 1 egg white

  • spices to taste - I used seasoning salt, black pepper, and Himalayan pink salt.


Steps:

  1. Preheat oven to 450 degrees.  

  2. Spray a cookie sheet with cooking spray.

  3. In a med. bowl, whisk together spices and egg white.

  4. Dredge the potato wedges in the egg white - spice mixture.  Coating all of the wedges.

  5. Place on cooking sheet.

  6. Bake for 15 minutes.  Flip the wedges over.

  7. Bake for another 15 minutes.

  8. Enjoy with your favorite condiments!


Jan 5, 2013

Wilted Spinach

20121231-104548.jpg

My hubby does not like raw spinach or lettuce. He calls them rabbit food. I've gradually started having him actually like eating cooked spinach. This recipe is one of the ways.

It's a simple side dish and is quite tasty.

Wilted Spinach


Stars of the recipe:

  • 1 Tbsp. Extra Virgin Olive Oil

  • 2-4 c. baby spinach

  • 1 clove of garlic (more if you like garlic) or 1-2 Tbsp. minced garlic


Steps:

  1. Heat a skillet on medium heat.

  2. Add the extra virgin olive oil and garlic. Cook for 1 to 2 minutes.

  3. Add the spinach and cook until it's wilted. (It only takes a few minutes.)

  4. Enjoy!

May 19, 2012

Bacon Cheddar Ranch Smashed Potatoes

Say that 5 times fast.  Such a tongue twister of a name for a recipe. 

I got a whole chicken from my favorite meat places and decided to cook it up in the crockpot.  Then it was time for the task of trying to figure out what to serve with the chicken.  The other day I had bacon cheddar smashed potatoes at O'Charley's restaurant.  They were so delicious!  I decided to make my own version of that side dish. 

It was so yummy!!!  In fact, hubby had two helpings of the smashed potatoes.  He couldn't stop raving about how good the potatoes were.  Score!!!

Stars of the recipe:

  • 4 red potatoes, washed and cut into smaller pieces

  • 3 Tbsp. butter

  • between 3 Tbsp. to 1/4 c. bacon bits (either cook up bacon and then cut into pieces or get already cooked bacon pieces)

  • 1/4 c. shredded cheese

  • 2 Tbsp. milk

  • 2 Tbsp. ranch dressing


Steps:

  1. Cut up potatoes into smaller pieces and then cover with cold water (about an inch above the cut up potatoes).

  2. Cook on high heat for about 10 to 15 minutes until the potatoes are fork tender.

  3. Drain the potatoes but don't rinse.  Put potatoes back in the pot.

  4. Add the butter and milk.  Smash the potatoes.

  5. Add the ranch dressing, bacon, and cheddar cheese.  Fold into the potatoes.

  6. Serve and enjoy!

Feb 3, 2012

Roasted Potatoes

I've been working on perfecting this side dish for years.  I've finally found the best method to make tasty potatoes that are cooked all the way through and have crispy on the outside.

I cut each potato into 16 pieces so they cook up faster.


Roasted Potatoes

Stars of the recipe:

  • small potatoes (We like yellow potatoes.), cut into smaller pieces (I cut them into 16ths)
  • extra virgin olive oil (Enough to coat the potatoes.)
  • spices (Use your favorite spices ~ I like to use seasoning salt.)


Steps:
  1. Preheat oven to 425 degrees.
  2. Cut up the potatoes.  Place the potatoes in a mixing bowl.
  3. Drizzle olive oil over the potatoes.  (You only want enough to coat each potato).
  4. Sprinkle the potatoes with spices.
  5. Mix up the potatoes, olive oil, and spices.  (I use clean hands to do this.)  Make sure each piece of potato has olive oil on it.
  6. Place in a single layer on a cookie sheet.
  7. Sprinkle more seasoning on the potatoes.
  8. Put the cookie sheet in the oven.
  9. Bake for 30 minutes, flipping the potatoes over once while they are baking.
  10. Enjoy!
This post has been linked to Every Day Mom's Sunday Dinner.

Dec 3, 2011

Fried Potatoes

When I was a teenager, I lived with my mom and grandparents.  Even though my grandma was a great cook, she never taught me her recipes.  Oh, I have a few of her recipes because she gave them to me.  However, she and I never cooked in the same kitchen. 

One of the side dishes, she cook was fried potatoes.  I love the taste of the crispy crust of the potato when it's been fried in a skillet.  Yum!  Once I got married and moved into a place that I cooked dinner, I started to make fried potatoes.  The problem I encountered was that it took for-e-ver for the potatoes to cook up.  Through practice, I learned the secret is to put a lid on the skillet while the potatoes were cooking.  Not all of the potatoes get that crispy crust though.  That's fine though, the boys refuse to touch them.  I get to eat the potatoes with the crispy crust and the boys get to eat the mushier potatoes.

One way to check to see if the potatoes are cooked throughout is they become translucent like when they have finished cooking. 


Stars of the recipe:

  • 3 to 4 potatoes cut into slices, I use russet but you can use whatever kind of potatoes you want

  • 1/2 onion cut into rings

  • oil, I use extra virgin olive oil

  • salt and pepper to taste


Steps:

  1. Cut potatoes into slices and onions into rings.

  2. Coat the bottom of a skillet with oil.  As Rachael Ray says, twice around the pan with the oil. (I use a cast iron skillet.)

  3. Turn the stove on to med.  Let the pan warm up.

  4. Add the potatoes and onions.  Season with salt and pepper.  Put the lid on the skillet.

  5. Let the potatoes cook for about a few minutes.  Then flip the potatoes to make sure they don't burn.

  6. Continue cooking the potatoes, flipping the potatoes every few minutes.

  7. The potatoes will be finished when translucent looking.

  8. Enjoy!


Nov 25, 2011

Honey Glazed Carrots in the Crockpot

My husband doesn't eat raw carrots but eats cooked carrots.  The Imaginative One doesn't eat cooked carrots but eats raw carrots.  So it makes it interesting for deciding what veggies to cook for dinner.  I saw this recipe and decided I needed to make it for Thanksgiving.  It fit the criteria of:  easy, quick, and cooks in the crockpot.  During the Thanksgiving parade, I prepped the carrots and let them cook right before dinner.  Since my crazy son doesn't eat cooked carrots, I also made corn for him. 

Oh, and the taste!  They were delicious.  Since it was so easy, I may prep the carrots and have hubby put them in the crockpot one day so we can have them for dinner.

Honey Glazed Carrots


Eat at Home


Stars of the recipe:


  • 1 pound of carrots, cleaned and cut into 1 inch pieces


  • 2 Tbsp. of butter


  • 2 Tbsp. of honey


  • salt and pepper to taste


Steps:


  1. Spray 2 or 3 quart crockpot with cooking spray.


  2. Place carrots in the crockpot along with butter.


  3. Drizzle the honey over the carrots.


  4. Season with salt and pepper.


  5. Cook on high for 3 hours.


Nov 24, 2011

Cranberry Relish - Crockpot Style

Today is Thanksgiving and I have a lot to be thankful for this year.

  1. My family and friends

  2. God showing me a talent. This talent has allowed me to see the beauty of his world in a way I've never seen it before.

  3. Laughter - Hearing the boys laugh brings joy to my soul.

  4. My students both current and former

  5. My health - During June I suffered terrible headaches. For three almost four weeks I had headaches that were persistent. Luckily a trip to the chiropractor helped relieve them. Then in September and most of October I had a persistent cough. Fortunately for me both are better.

  6. God giving me 2 boys who are bright and surprise me with their knowledge and insight about the world around them.


Now onto the recipe. On Sunday, my father-in-law informed us he was cooking a chicken for Thanksgiving. There was going to be only 6 of us for dinner and he didn't want to deal with all the left-overs. The family convinced him that he needed to make a turkey. I wanted to help make the dinner so I decided what I was going to bring. One of them items was going to be homemade cranberry relish. Yesterday I stumbled on this recipe.

Earlier in the week I had created a list of things I needed from the store. One of the items was an orange for the relish. My husband went shopping but didn't buy an orange. His reasoning was I had oranges at the house. I have grapefruit and clementines but no navel oranges. So I made a trip to Save-A-Lot to go get the oranges. Boy I'm glad I did. This recipe is easy and the end result was delicious.

Cranberry Relish


Stars of the recipe:


  • 2 oranges

  • 1 bag (12 ounces) cranberries, rinsed and picked over

  • 1 cup sugar

  • pinch cinnamon or Chinese five spice

  • 3 tablespoons water


Steps:


  1. Zest the oranges.


  2. Cut off the remaining outer peel and pith and discard.


  3. Cut the peeled orange sections into small chunks and add to the slow cooker along with cranberries, sugar, cinnamon, and zest.


  4. Add water.


  5. Cover and cook on HIGH for about 2 hours. (I had to put it on low for about 1/2 hour after cooking it on high.)


I hope you had a great holiday! What are you thankful for?

This post is linked up to Eat at home's Ingredient Spotlight.

Jul 20, 2011

Homemade French fries

I forgot to take any pics of the French fries. 

The Wee One's favorite meal is chicken nuggets and French fries.  I put that on our meal plan last week.  We never got to it so it was moved to this week's meal plan.  I'm glad we did because my hubby fixed our fryer so we could have fast food type French fries.  Yummy!

These take time but the rewards are so worth it.

Stars of the recipe:
  • russet potatoes (I used 4 and ended up with enough for 5 people.)
  • salt (sea or seasoned)
  • vegetable oil (for the fryer)
Steps:
  1. If you want no skin on the potatoes, peel them now.  (I keep the skin on my potatoes.)
  2. Cut the potatoes into French fry size pieces.  I wish I had a method but I don't.  I do cut the potatoes in half long ways and then half again long ways.  After that, I try to get them into French fry size pieces.  (My hubby likes them thinnish so I get them down to that size.)  Place them in a bowl.
  3. Fill the bowl to about an inch over the potatoes.  Let it sit for about half an hour.  In the mean time, lay a cookie sheet with paper towels on it to the side.
  4. After the half an hour, drain the potatoes and then  pat them dry.  You want no moisture on the potatoes at all.  (I put a clean kitchen towel back in the rinsed out bowl and then dropped the potatoes on there.  I patted each layer with the kitchen towel to assure there was no moisture on the potatoes.)
  5. Meanwhile put the oil in your fryer and wait for it to warm up.  You know it's ready when you put a wooden spoon in there (handle side down) and there are bubbles around the handle.
  6. Put a layer of potatoes in the fry basket and then into the fryer.  Shake the fry basket until all the potatoes are in the oil.  Cook for about 5 minutes.
  7. After the fries are cooked, take the fry basket out of the fryer.  Transfer the fries to the prepared cookie sheet.  (I put a plate under the fry basket while transfering the fries so I don't spill any of the hot oil.)  Immediately season the fries.
  8. Continue with the other potatoes until all of the fries are cooked.  Enjoy!
Happy eating, Traci

May 27, 2011

Grandma's White Salad

I have so many memories of this salad.  One of my best memories is from when I worked in Walt Disney World in 1995.  My grandma sent me various family recipes so that I could have a little bit of home while down there.  When Thanksgiving time came, I decided I would make a Thanksgiving meal for my friends and I to share.  We had a Thanksgiving meal with all the trimmings except we had chicken instead of turkey.  One of the dishes I made was white salad.  For two weeks afterward, I would take portions of the Thanksgiving meal to work for my lunches.

That Thanksgiving weekend was also the weekend I almost met Rider Strong and Ben Savage from Boy Meets World.  At Disney-MGM Studios, now Hollywood Studios, they would have celebrities put their hands in cement at the Chinese Theater.  Both Rider and Ben put their hands in the cement and then went to have a talk.  I "ran" along side of their convertible as they traveled between venues and then ended up sitting behind their families.  Too bad, Fred Savage was not there.  I would have gone up and said hi to him.
My Grandma's White Salad


The stars of the recipe:

  • 1 sm. lemon or lime  jello
  • 2 c. hot water
  • 1 8 oz. package of  cream cheese
  • 1- 15 oz. can of crushed pineapple drained '
  • 1 and 2/3 c. mini marshmallows
  • 1 and ½ c. chopped pecans or walnuts (My grandma used pecans.)
  • 1 container of cool whip.
Steps:
  1. Mix jello with water.  Add cream cheese and beat until smooth.
  2. Put in fridge until semi solid.  Remove and then put in the rest of the ingredients. 
  3. Chill.

Or how my grandma made it:

  1. Mix jello with water.  Add cream cheese and beat until smooth.
  2. Put the rest in ingredients in a in flat pan (9 by 13 glass dish).  Put it in the fridge to chill.
This post has been linked to Eat at Home's ingredient spotlight.
Happy eating, Traci

Cannellini and Green Bean Salad

This is an easy side dish.  My hubby who usually does not enjoy salads even liked it!  The boys however were not too thrilled about this side dish.  You can't win it all.

Stars of the recipe:
  • 1 15.5 oz. can of cannellini beans (white kidney beans)
  • 1/2 lb. of fresh green beans, trimmed
  • 1/2 red onion, chopped
  • 1 tbsp. white wine vinegar
  • 3 tbsps. extra virgin olive oil
  • coarse salt and ground pepper to taste
  • 21 season salute to taste (Trader Joe's spice - my favorite spice blend), optional
Steps:
  1. In a bowl, whisk together the vinegar and oil.
  2. Season with the salt. pepper, and 21 season salute
  3. Meanwhile, cook the green beans in a pot of boiling salted water for about 5 minutes.
  4. Drain and rinse with cold water.
  5. Add the green beans, cannellini beans, and red onion to the dressing bowl.  If needed, season with more salt and pepper. 
  6. Toss all ingredients together.
  7. Serve


Happy eating, Traci

Jan 6, 2011

Spanish Rice

We had tacos for supper.  For a side dish, I made Spanish rice.  The recipe I used was an easy recipe to follow.  It was also delicious.  Which is a great combo!

My hubby was a little skeptical when he saw the rice.  He typically loves rice but is not a big fan of the spices used in Mexican cooking.  I let him know that I used a little less then what the recipe called for.  Once he tried it, he told me that it was good.  The Wee One also told me that he thought it was good.

Spanish Rice

 www.menus4mom.com

Stars of the recipe:


  • 3 Tbsp. EVOO (extra virgin olive oil)

  • 1 c. onion chopped

  • 1 tsp. garlic, minced

  • 1 c. green pepper, chopped and seeded

  • 1 c. long grain rice (or brown rice)

  • 2 c. chicken broth (if using brown rice add extra water)

  • 2 tsp. tomato paste

  • 1/2 tsp. cumin (I used less.)


Steps:


  1. Saute onion, garlic, and green pepper in oil until transparent.

  2. Add rice and brown until lightly browned.

  3. Mix the rest of ingredients and add to pan.

  4. Cook and cover 20-25 miutes (longer closer to 45 minutes for brown rice).


I did steps 1 and 2 in the a skillet.  Then I put the onion, garlic, green pepper, rice and the rest of the ingredients in my rice cooker.  I let my rice cooker finish the cooking.

Possible toppings:  Sour cream and cheddar cheese - Delicious combination

Oct 4, 2010

Menu Planning - Week of October 4 (with recipe)

Monday - mini meatloaf (freezer), butter noodles, veggies

Tuesday - crockpot chicken, mashed potatoes, green beans

Wednesday - cornbread pizza, raw veggies or salad

Thursday - creamy caesar chicken pasta bake, veggies, garlic bread

Friday - hot dogs, French fries, raw veggies

Saturday - left overs

Buttered Noodles -


  • 1/2 package of egg noodles (I used wide noodles.)

  • 1.5 to 2 Tbsp. of butter

  • salt and pepper


  1. Boil the noodles according to directions on the package.  Drain the noodles (save about 1/2 cup of the starchy cooking water).

  2. Melt the butter in the microwave for about a minute.  Add some of the cooking water to make a sauce. 

  3. Add the drained egg noodles.  Stir to cover the noodles.

  4. Season with salt and pepper.


My oldest son loved the noodles.

This recipe is linked up to Menu Planning Monday.

Sep 3, 2010

Crockpot Baked Potatoes

I had read you could cook backed potatoes in the crockpot but I was skeptical on whether it worked or not.  Since baked potatoes were on my meal plan for Thursday night, I decided to test out if you could cook them in the crockpot or not.  I am no longer a skeptic because it really worked.  My hubby even told me that they were delicious.

Stars of the recipe:


  • russet potatoes - (I didn't put a quantity because it depends on how many you want to make.)

  • extra virgin olive oil

  • salt


Steps:


  1. Wash the potatoes and then poke the potatoes.

  2. Wrap each individual potato in foil and then place in the crockpot.

  3. Put about 1 to  Tbsp. of water in the bottom of the crockpot.

  4. Turn the crockpot on low and cook the potatoes for about 4.5 hours.

  5. When they are finished, unwrap them and put in a bowl. 

  6. Douse them with Extra Virgin Olive Oil (EVOO) just to lightly coat them.

  7. Sprinkle them with salt.

  8. Enjoy with your favorite baked potato toppings.


For other great recipes, visit Tempt My Tummy Tuesday.

Aug 21, 2010

Lemon Basil Pasta

I found this recipe on The Pioneer Woman's website.  Since I had put some lemon chicken in the freezer, I decided that this would really compliment the chicken.  The pasta dish is pure heaven.  Okay maybe not pure heaven.  However, it was delicious and the smells coming from cooking it or even heating it up makes me happy.  In fact, I took it to work for lunch and one of my fellow teachers complimented me on the smell of the dish.  If you get a chance, make this dish and escape to happiness from the taste and smell.

Stars of the Recipe


  • 1 pound Penne Pasta, Cooked Until Al Dente

  • ½ sticks Butter

  • 3 whole Lemons, Juiced (I also used some of the lemon rind to add another depth of flavor.)

  • ¾ cups Heavy Cream (I used heavy whipping cream.)

  • ¼ cups Half-and-half

  • 1-½ cup Grated Parmesan Cheese (or Romano)

  • Salt And Freshly Ground Black Pepper, To Taste

  • 20 whole Basil Leaves, Chopped (I used basil paste in a tube.  It's all I could find.  I used maybe a tablespoon to a tablespoon and a half.  I didn't measure.)


Directions


  1. Cook pasta, reserving 1 cup of hot pasta water when you drain.

  2. Set pasta aside in a colander.

  3. In the same pot, melt butter over medium heat.

  4. Squeeze in the juice of 3 to 4 lemons. (Also use a microplane to grate some rind.)

  5. Whisk together.

  6. Pour in cream and half-and-heat. Whisk until hot.

  7. Dump in cheese and whisk until melted.

  8. Add salt and pepper.

  9. Check consistency, adding some of the hot pasta water to loosen the sauce if needed. (I didn't need to add that much.)

  10. Pour pasta and sauce into a large serving bowl. Sprinkle remaining basil all over the top.  (I skipped this step.)

  11. Serve!


This recipe is great as a side dish or eaten by itself.

For other great recipes, Potluck Sundays, Delicious Dishes , and Tempt My Tummy Tuesdays.

Aug 7, 2010

Make Over Macaroni and Cheese

Last week, I was looking through Taste of Home's Healthy Cooking Magazine when I saw a recipe for makeover macaroni and cheese that used no butter in it.  It was also very simple to make because you make a roux of milk and flour and then add Velveeta (or a similar off brand cheese) and cheddar cheese to make a cheese sauce.  You then add that cheese sauce to cooked pasta such as elbow macaroni.  The texture reminds me of Kraft's Deluxe Macaroni and Cheese with the cheese packet instead of the powder cheese sauce.  When I served it, my hubby and the Wee One loved it.  Both of them went back for seconds.

I love having this in my arsenal of side dishes that are simple to make especially when I'm in a time crunch.


Stars of the recipe:


  • 1/2 package elbow macaroni or shells
  • 1 tablespoons all-purpose flour
  • 1 cups fat-free milk
  • 1/2 package (16 ounces) VELVEETA Pasteurized Prepared Cheese Product cubed or similar store brand
  • 1/2 cup (2 ounces) shredded sharp cheddar cheese, divided
Steps:
  1. Cook macaroni according to package directions.
  2. Meanwhile, in a large saucepan, combine flour and milk until smooth.
  3. Bring to a boil; cook and stir for 2 minutes or until thickened.
  4. Stir in process cheese and 1/4 cup cheddar cheese until smooth.
  5. Drain macaroni; stir into cheese sauce.
  6. Remove from the heat; sprinkle with remaining cheese.
  7. Cover and let stand for 5 minutes or until cheese is melted. 
This recipe makes 4 servings.

This post has been linked to Mommy's Kitchen for Potluck Monday and at Colleen's Kitchen Recipe Swap.